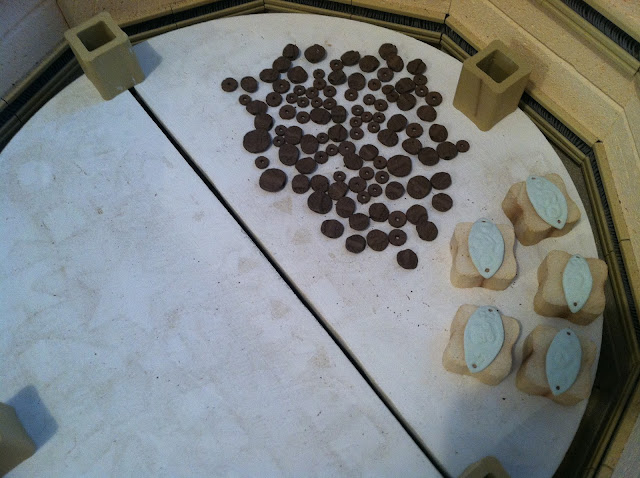
I'm particularly excited about this load since it includes several new styles in an african/tribal theme, including Clay Dings and Spool Beads. I can't wait to see how these turn out!
Glazing...
This batch included several pieces in Black Raven stoneware. I am using a technique that involves dipping in white porcelain, then glazing in one of my favorite colors: Hot Coral.
I'm using a similar technique on these little spool beads: first I dot the rims with dabs of white porcelain, then I build up dots of Hot Coral glaze on top of them to create little "bumps".

Next comes the fun part (not!): loading the kiln.
Again, depending on the size of the load (and number of shelves), this can take anywhere from 1 to 3 or more hours. Today's load took about 2 hours, and 1 1/2 shelves.
My bottom shelf sits about 4 inches off the kiln floor - the bottom of my kiln tends to get hotter than the upper areas so I find that this little bumper space helps. As you can see, the bulk of my load is going on this shelf. I also consider this my "cone 6 sweet zone". I leave about 8 vertical inches here - the next shelf will sit on top of the square posts.
After I get everything on racks (at my workbench) I carefully move them to the kiln. Here I am doing some final straightening of gear links - I want these to hang as close to 90 degrees on the hanger bar as possible. I found this helps to prevent twisting and warping during the firing. I am also doing a final check of every single bead and component to make sure they are not touching each other (if they did, they will become permanently fused together) or the sides of racks or other kiln furniture (again, to prevent fusing). Glaze is pretty much glass - you have to think about what it might touch when it is molten - whatever it touches it will fuse to. The insides of beads and hoops are therefore bare clay (not glazed), so that when hung on wire racks they will not fuse to them.
The second shelf contains whatever I couldn't fit on the shelf below - mostly several black raven pieces - once fired to Cone 6, they will become a yummy deep black. :)
I top off the load with a "cap shelf" to help contain the heat within the loaded shelf zones below. Its kinda like making a sandwich with the shelves - the top and bottom shelves help to hold the heat in the zones where the glazed ware is stacked.
That's it - I started the kiln up at about 8:30 pm. Tomorrow I get to open it up and see what I got! Stay tuned!


This is a great post! I just LOVE to see how others load their kilns! Thanks so much.
ReplyDeleteI can hardly wait!!!!!!!!
ReplyDeletePretty cool looking how you load your kiln Karen, I'd love to get a bigger one someday. Can't wait to see what your goodies look like!
ReplyDeleteThis was so cool to read! I know my pieces are in there so it's very cool to be part of the process, sort of! Thanks for sharing!
ReplyDeleteoh my gosh, it's very intricate in there!! whew!! (it looks like a little miniature...pottery store!) can't WAIT to see your African tribal pieces!!
ReplyDeleteThis was facinating to me Karen. I love using clay beads and components, but I know nothing about how they are made. Thanks for the peek inside your studio!
ReplyDeleteWhat a fun post to read, Karen! I love watching people's process, and this is just fascinating. I really, really LOVE the process with the white porcelain dip and the coral glaze. Can't wait to see these finished pieces, especially the tribal stuff. Yay! : )
ReplyDeleteThanks so much for posting how you do this! I love your beads so I'll be excited to see how they turn out!
ReplyDeleteAlways great to see parts of the process, fun stuff Karen, thank you for sharing!
ReplyDeleteDrat you, Karen -- those dipped beads remind me of cookies, and it's making me hungry, so there goes the diet. What a fascinating process. If only customers could see how long it takes and the steps involved perhaps more of them wouldn't mind paying for it!
ReplyDelete